Written by Jake Brady

Coastal vs Hamptons. What’s the Difference?

If you’ve been flicking through home design magazines of late, you may have noticed a big shift towards coastal and Hamptons-style homes. Both design trends have become increasingly popular in Australian home design, especially in coastal regions such as the Illawarra. 

Although both design styles are inspired by the coastal lifestyle, there are subtle nuances between the two that speak to different tastes. Hamptons style marries elegance and luxury with understated nods towards the seaside theme, whereas coastal style is raw and bohemian, bringing elements of the outdoors in.  

Read on to discover which style would suit you best.

The coastal trend: rustic chic that brings the outside in

Strolling barefoot from the sand and straight into your dream house… This is the relaxed vibe that coastal style brings to your home. This design trend is very popular along the South Coast and Illawarra region, where laidback  living is fully embraced.

A feeling of lightness and airiness is key to the coastal look, with a flowing layout used as a way to bring the outdoors in. Those who enjoy colour may prefer this style over the muted tones of the Hamptons. Look to the outside landscape for your colour palette – take your lead from the sea with a variety of blue hues and seafoam greens or add gold and yellow accents as a nod to sun-kissed sands. 

Native elements and reclaimed timber all work beautifully for the coastal look. When selecting fabrics and rugs, lean towards more natural textures such as raffia and linen, which will complement the raw wood and outdoorsy elements.

The Hamptons trend: luxe living inspired by the coastal living

A two-hour drive from Manhattan, the upscale seaside enclave of the Hamptons is the birthplace of this timeless design trend.

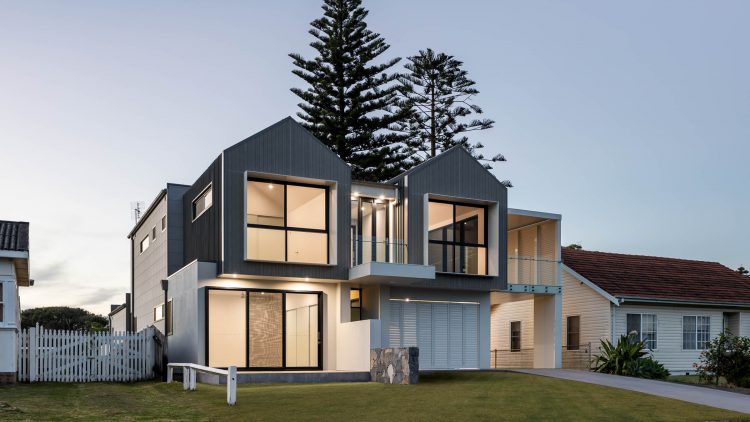
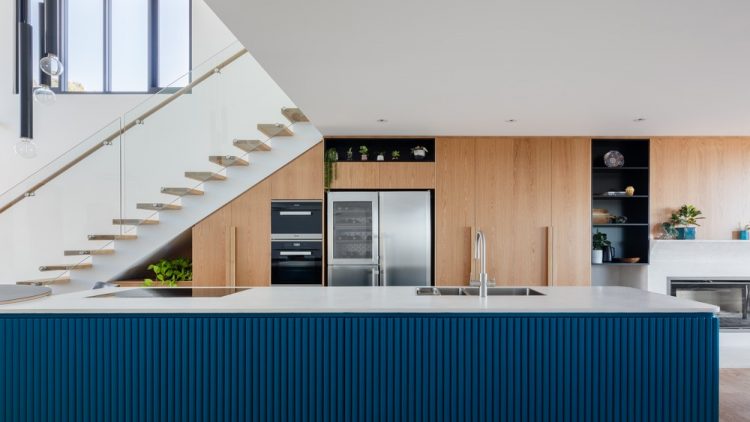
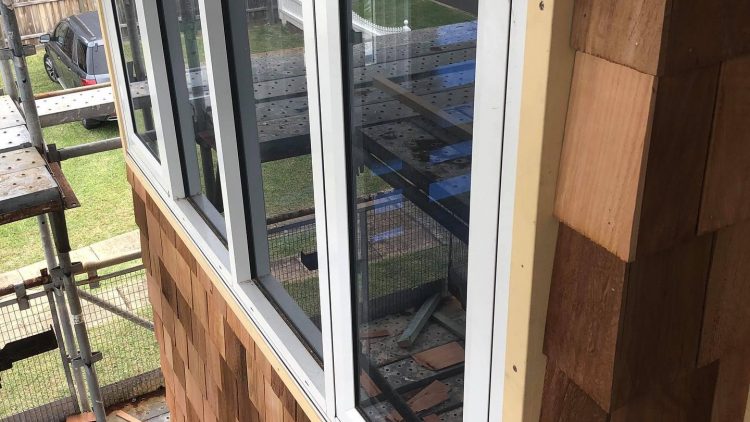
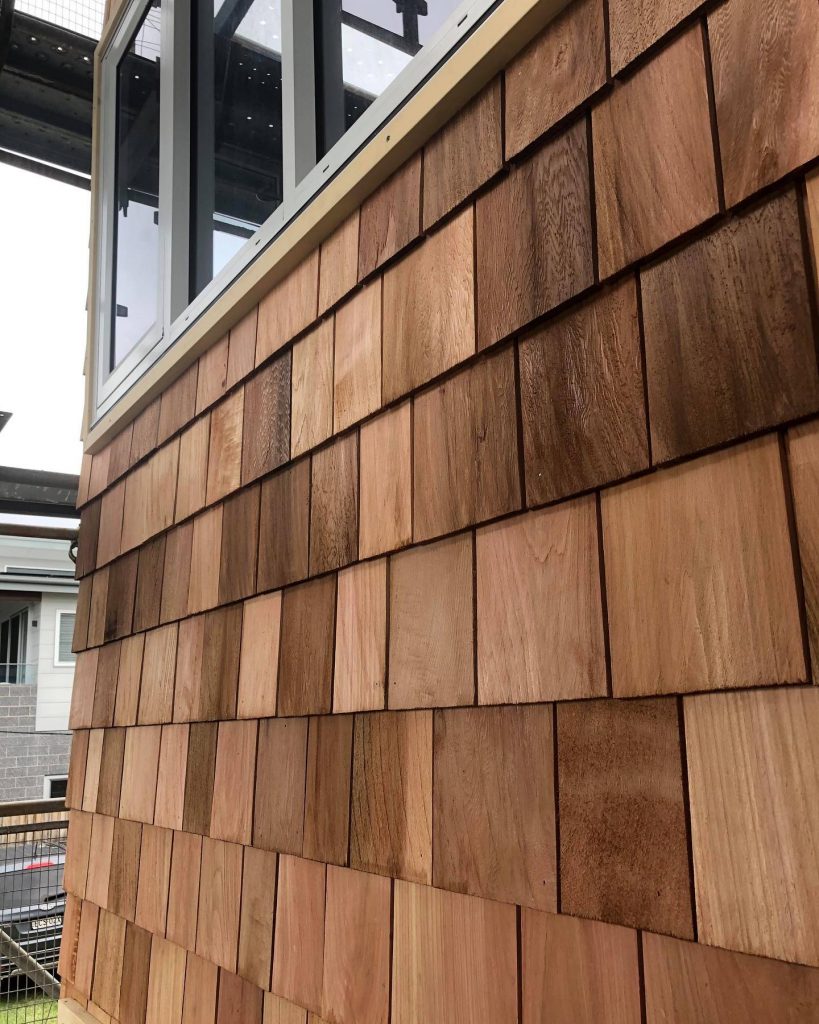
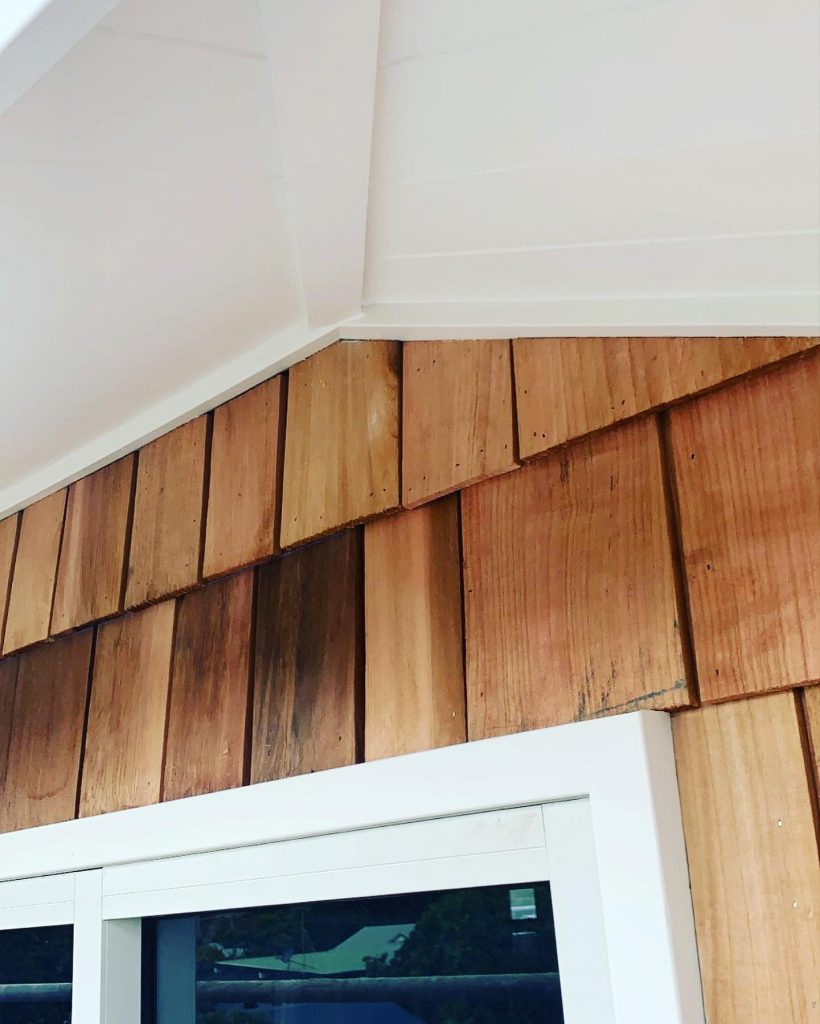
Marrying the seaside vibe with a dash of luxury, Hamptons style offers a much more polished finish than coastal style. A blank canvas of tasteful neutrals and lots of white space sets the scene, with accents of blue, steel grey or taupe used sparingly. Think glossy rather than rustic: polished floors and dark timber paired with crisp shaker-style cabinetry. Perhaps most iconic of the Hamptons style is exterior weatherboard cladding, which gives a subtle and tasteful nod to its coastal origins.

The finishing touches bring this sophisticated look together. Luxe cashmere throws, paisley silks, botanical artwork and fresh flowers are all typically ‘Hamptons’.  

Below, we’ve delved into the powerful design differences between these two styles by the five main elements:

  1. Colour palette
  2. Textures
  3. Patterns
  4. Space
  5. Flora

Colour palette 

If you lean towards cooler tones when it comes to your interior design, then the Hamptons style may be more to your liking. Think crisp and clean walls in eggshell white, and accents like sculptures, vases, throws and cushions in steel grey, rich navy, cool stone or earthy taupe. The Hamptons colour palette is designed to evoke sophistication, serenity and luxury. You won’t find rainbow-bright colours in a Hamptons home, so leave your ruby reds, sunbeam yellow and bold magentas outside.

As for a coastal home, the colour palette skews to the warmer side of things. While still achieving a clean and neutral look, you’re more likely to find base colours like off white, sand, beige and tan which give your space a warmer, inviting feel. Good news for colour enthusiasts: a coastal home welcomes colours. Take inspiration from your own backyard or the beach. Unfurl a rug with flourishes of turquoise and aqua in your living room, add a statement lamp in seafoam green to your bedside table, or choose a linen duvet in a limoncello yellow. 

These colour accents are what differentiates between the coastal and Hamptons-style home, both which could be similar with their neutral bases.

Textures

The Hamptons style evokes a sense of refined elegance, reminiscent of the area’s luxurious summer retreats. To create a truly dimensional Hamptons look, incorporate a variety of textures. Layer a jute rug over polished floors, add plush cushions to your sofa, and consider darker woods like rosewood or walnut for furniture pieces.

Using raw and natural materials to add texture in a coastal-style home is a huge differentiating factor between these two styles. This décor style references living close by the ocean, therefore it’s a great idea to embrace raw and natural textures and materials when designing and decorating your home. 

Similar to a coastal landscape, in a coastal home you can find light, rough wood for a dining table, chairs or bookshelves, stacked stones for feature walls, or twisting driftwood. Add softer elements like loosely knitted throws, wicker furniture and raw linen to elevate your design.

Patterns

As both Hamptons and coastal homes tend to err on the side of minimalism when it comes to décor, incorporating patterns is an easy way to add an extra layer to your look. For a Hamptons-style home, you are usually limited to high-end patterns like brocade, paisley or geometric prints – often in a gorgeous navy hue. Adding pattern through a statement rug, table runners or cushions is a simple way to achieve this design element.

Patterns can work to emphasise the nautical element of the coastal-style home – but make sure you don’t overdo it! Used sparingly, striped patterns, coral prints and rope details can tie the entire theme together without going so far as to become kitsch. Adding artwork to blank walls can be an ideal way to work patterns into your décor, or if you prefer to go even more subtle you could opt for patterned linen napkins, crockery or photo frames. 

Space

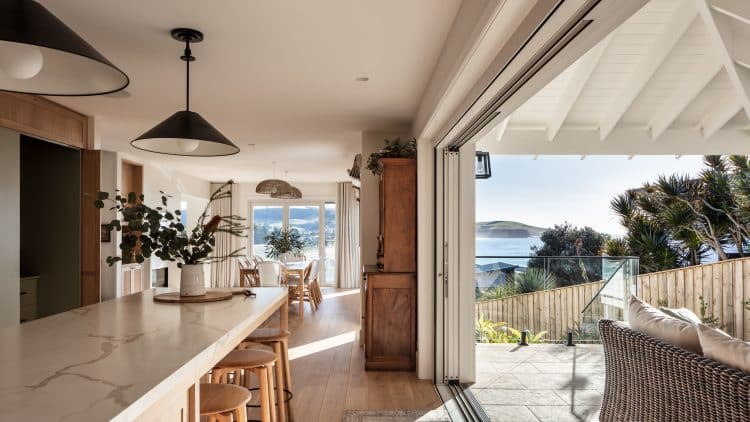
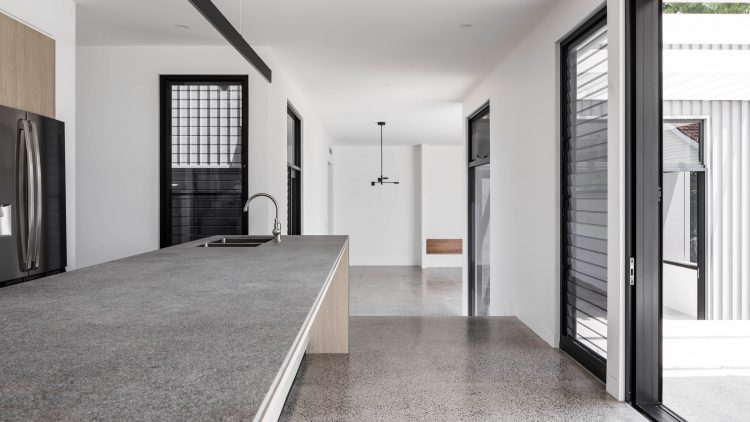
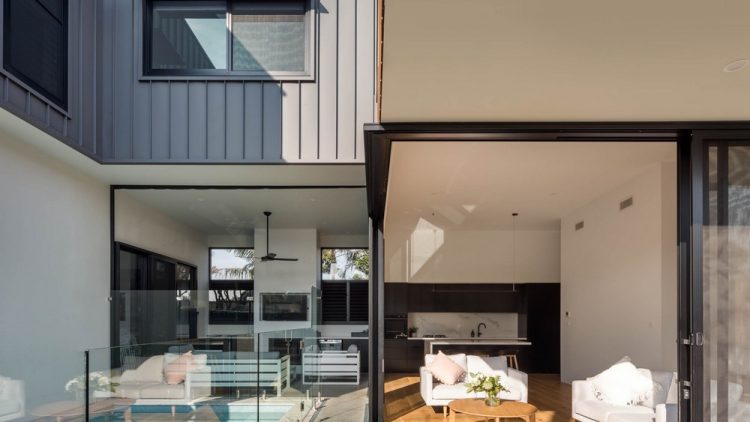
As both Hamptons and coastal-style homes are designed with beach living in mind, it comes as no surprise that both layouts are designed to be open, flowing and flooded with natural light. A space should flow seamlessly into another; there are no poky corridors or labyrinthine twists and turns. 

Invite the outside world in with large glass sliding doors that open up onto the patio where an alfresco dining area awaits. Inside, expansive windows can capture the light from gentle morning rays to sunset’s golden hour. Skylights are a great way to brighten up rooms or hallways that don’t have access to a window. 

There are a couple of key differences between a Hamptons home and a coastal-style home when it comes to space. A Hamptons home favours high, tapered ceilings that add an undeniable flare of luxury to the space. In addition to this, expansive picture windows to show off the views give the effect of larger rooms. As for a coastal-style home, open-plan layouts like an open-plan kitchen, dining and living area give the space a harmonious flow effect.

Flora 

Adding greenery or flowers not only breathes life into any indoor space, but it has the unexpected benefit of aiding our physical and mental wellbeing (a large reason why biophilic design is one of the leading interior design trends for 2024!). Happily, incorporating flora and greenery is a fundamental part of both Hamptons and coastal-style homes. 

To emphasise the luxurious sophistication of a Hamptons home, consider adding white roses or lilies to vases throughout the space. Outside, dark green leaves and hedging bushes will achieve that luxury, freshly landscaped vibe you’d find in any New Yorker’s Hamptons home. 

For a coastal-style home, you can afford to be a little more relaxed with hardy succulents, spiky snake plants and aloe vera. If you don’t consider yourself a green thumb have no fear – these are all considered easy-care plants. As for inside, native plants are your friend. To a ceramic vase, alternate between a bold, native waratah, leafy eucalyptus, acacias or kangaroo paws for splashes of colour.

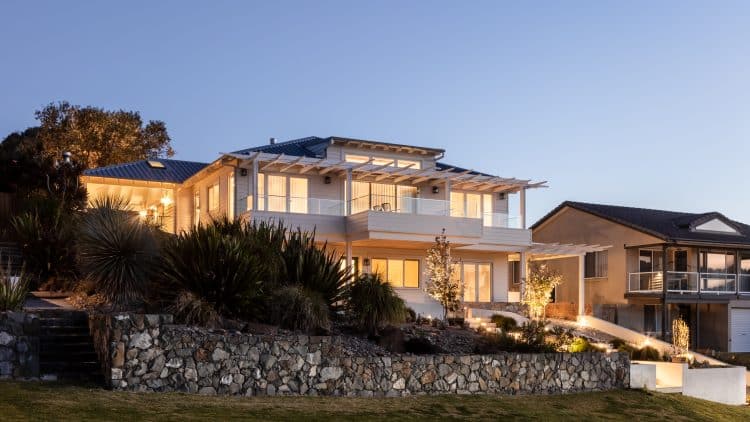
Enjoy the best of both worlds

Creating your own home is about ensuring everything is to your taste, so why not tear up the rule book and cherry-pick aspects of both styles that you like? This Werri Beach home seamlessly integrates the two themes for the ultimate in relaxed coastal elegance.   Looking to create a design that blends perfectly with the coastal lifestyle? Get in touch with the expert team at Smartbuild South Coast today and let’s chat about your dream home

quality control
Written by Jake Brady

5 Ways Your Builder Manages Quality Control Through The Building Process

While incredibly exciting, building your dream home can be an overwhelming experience. And, if it’s your first time, you may be asking yourself questions like what the process will look like, when to add input, and how your builder ensures high quality is achieved across the board. In this blog, we’ll share with you five ways your builder will navigate quality control, so you can have a better idea of what to expect.

First, let’s define quality control. When we say ‘quality control’, we’re referring to meeting the expectations that have been outlined in your building contract and in the regulations that impact your build. It’s simply the processes and procedures your builder utilises to ensure the design needs are met, that the budget is adhered to, that best practice is utilised at all stages of the build, and regulations are followed.

Now that you have a better idea of what quality control is, let’s dive into some of the ways your builder will manage it.

Planning

Putting together a thorough plan ensures your build will progress as smoothly as possible. From pre-build requirements such as permits and approvals, to budgeting, through to timeframes, a solid plan allows you and your builder to track the progress across every aspect of your build.

Communication with the architect

Liaising with the architect is crucial to ensuring the approved house plans and designs are fulfilled. A preliminary conversation around the design is a great starting point for your builder and architect to identify and mitigate any issues from arising during the building stage. And your builder should supplement this with any calls, appointments, or on-site checks with your architect should any other practical issues come into play. That way, your vision can be championed.

Open communication

Arguably the most important of the five, open communication is critical to quality control. From the beginning of the build, they should be sharing their targets with you and the architect, and their plan to achieve them. They should be transparent about the process, and keep you up-to-date each step of the way. Some builders choose to do this with regular phone calls or meetings, while others may have a streamlined client portal on their website that notifies you in real-time as your project proceeds.

Regular on-site visits

Your builder should conduct regular site visits, especially when subcontractors are involved. They should operate as a site lead, ensuring everything is running smoothly, and giving direction when necessary. This avoids discrepancies only being noticed in the later building stages, where it may be too late or costly to amend.

Processes

Everyone operates differently, so it’s likely your builder has their procedures or processes in place to manage quality control. If they haven’t shared any with you, it’s a great rule of thumb to ask them and find out how they deal with things, from safety checks to test and audits.

At Smartbuild South Coast, having a strong relationship with our clients is one of our top values. That means digging deep to understand your vision, making the process as streamlined and easy for you as possible, and always being transparent and open with how the build is going. This allows you to be actively involved in the process and feel confident that your dream home is in good hands.

If you’re looking to start building your dream home, contact our expert team today.

Written by Jake Brady

How To Fuse Different Materials In Your External Façade

Creating a place to call home is special. There’s something rewarding about putting your own touches to a house to make it your own. From entertainment areas for family and friends, to beautiful spaces for solitude, each part is special. And this includes the façade of your home because it makes the very first impression.

Today we’re spoilt for choice when it comes to the materials we craft our homes from. Here we look at different materials you can use for your external façade and how to fuse them to create your picture-perfect home.

Timber

Hard wearing and practical yet beautiful, timber cladding is a great choice to work into your façade. Treated native timber is suited to Australia’s unique elements, and it’s eco-friendly too as it’s sourced locally so reduces carbon miles. You can choose from a range of colours and shades to set the literal and metaphorical tones of your home!

Brick

Long-lasting and offering a classic look, bricks are an excellent building material for the façade of your home. They are low maintenance and extremely durable because they age slowly. Their unique colouring delays any signs of dirt build up, and their natural strength adds stability to your home’s structure.

Bricks add to the sustainability of your home by acting as great insulation. And for fire prone areas, bricks are naturally fire resistant, making them a smart and safe choice.

Glass

A classic building material, glass adds beauty and visual interest to the façade of your home. Reflecting light, it plays and morphs with the surrounding street scape. Glass brings natural light into your home too, creating space by illuminating corners and smaller rooms.

There has been great innovation with glass too, including double glazing for energy efficiency, and translucent treatments which add to privacy and aesthetic appeal.

Concrete

Simple, beautiful, and durable, concrete has come a long way in its use as a building material. Smooth or textured, concrete works effortlessly to tie elements together in a stylish and impactful way. Its versatility makes it both structural and aesthetic, and it’s resistant to fire and water.

Once you’ve decided on the materials you’d like to use for your façade, it’s time to consider how to fuse them to create the look and feel you want for your home. An architect can assist in balancing the ratios of materials as well as the placement.

When it comes to styling your façade, it’s important to consider textures and colours. Natural materials tend to blend easily due to Mother Nature’s colour palette. Or if you’re wanting to make a statement with bold colour choices, choose one or two that will work to create the impact you want.

Whatever your vision is, the façade reflects the home you’ve worked to create. It’s the first impression that invites you, and your loved ones, into your special space. And when you invest time and consideration, you’ll create the perfect feeling every time you come home.

If you have a vision for building something special, we’d love to talk with you. Contact us to start planning your build.

Written by Jake Brady

Getting The Right Angle: Maximising Aussie Winter Sun In Your New Home

When you build a new home, you often think about sunny afternoons spent on your new deck. Or the sunlight streaming through your kitchen window and onto your impressive new kitchen bench. You don’t usually think about how your home will be enjoyed in winter.

But that doesn’t have to be the case.

If you’re building a new home, you might want to consider a passive solar home, for example. They use clever design choices that take advantage of the sun’s heat to reduce those dreaded heating costs.

As a local Illawarra and South Coast-based company used to the winters here, our team makes sure each build best utilises the sun’s natural warmth to create a comfortable interior environment.

Eager to learn more? Here are six ways to maximise the winter sun in your new home.

What is meant by passive solar?

Passive solar differs from solar energy. Solar panels store energy for use in your home; passive solar energy is more of a direct relationship between the sun’s heat and the warmth of your home, amplified by informed design.

Passive solar design refers to architecture that maximises ways your home benefits from the sun’s heat—especially important in the chillier months. This way, you spend less on energy to remain warm indoors during winter.

Your building site

Orientation refers to the direction your home will face. In Australia, north-facing windows maximise passive solar energy as a general rule. Living, dining and biophilic alfresco spaces are best placed on the north side of the build.

Of course, large trees or tall buildings may block solar access on the northern side, calling for a design that maximises passive solar while taking into account the site’s conditions. Natural light in winter is the overall goal.

Windows and bi-fold shutters

Windows are an important aspect of internal heating and cooling. And while you want north-facing windows to optimise winter sun, it’s just as important you’re able to try and reduce the full force of the sun’s heat in summer.

Clever additions such as bi-fold shutters over windows allow you to adjust the amount of sunlight entering—and heating—the home, dependent upon the season and conditions. Shading is integral to regulating passive solar.

Eaves and awnings

Understanding the journey of the sun is important when designing a home. The sun moves at different angles across different seasons. You need to be able to minimise and maximise the impact of the sun on your build.

Carefully angled shading ensures when the sun travels at a higher path in summer, the sun’s rays enter in a limited way, while alternately allowing sunlight to reach your new home’s interior easily during winter months.

Maximising warmth

Although windows and clever shading allow sunlight in, that heat needs to be retained well during winter. How successfully your home absorbs and slowly releases that solar heat becomes a priority in the cooler season.

Why are certain rooms cold in winter, and others warm? Materials used in the build are part of the answer. Thermal mass references how well a material captures heat, and when the temperature drops, releases it.

Design choices with an impact

With access to winter sun heavily reliant on the north-facing aspect of your build, it’s best to avoid placing elements that obstruct access to natural light here. Examples include the garage, balconies and dense landscaping.

While locating them on other sides is ideal, be aware features can be placed on the north side. Intelligent passive solar design is key. For example, the right veranda will minimise summer rays, and maximise winter sunlight.

Building a comfortable home

Our portfolio of stunning Illawarra and South Coast projects means we know local weather, and how best to combat the extremes through clever builds. Talk to us to make your new home a glorious reality.

Written by Jake Brady

Timber or Concrete Flooring – What You Need To Know

When choosing a floor for your home, understanding the pros and cons of different flooring materials will help you make informed building choices, and create a beautiful home environment.

Whether you’re designing a custom home or improving your present abode, Smartbuild South Coast knows the important role flooring plays to merge aesthetic vision and practical concerns, as well as how it will affect your budget.

As popular custom home builders in the Illawarra region, we’ve worked with both timber and concrete with stunning results. Our specialist team can help pinpoint the perfect flooring for your upcoming project.

Timber

Timber floors have long been loved for their versatility and charm. The many woods, grains and replica woods on the market cater to both vintage-inspired architecture and contemporary home designs, complementing a range of interior trends.

From matte finish to high shine, pale glowing shades to rich warm colours, a perfect timber choice exists to suit every budget and preferred aesthetic. Timber flooring is often favoured for its smooth texture, and while still considered a firm feel, it provides a more subtle give than concrete.

There are many interpretations of so-called “wooden flooring” which span hardwoods, softwoods, laminates, vinyl, bamboo, and engineered timber. When selecting surfacing, it’s important to factor in future maintenance needs like re-polishing, and protective treatments.

Timber can eventually mark, depending on the amount of wear and tear as well as the choice of material. Wooden flooring can be at risk of cracking in summer heat as the years progress, especially if maintenance is neglected.

Dependant on your flooring choice, boards will need treating over time for continued protection. Even though wooden boards may call for more care, Australian custom home builders love the allure of timber flooring.

For those wanting hardwood or softwood floors, prices may be higher than expected in the near future due to supply shortages around certain materials. The Smartbuild team will ensure your home includes stunning flooring choices that respect your budget.

Concrete

Concrete is known for its strength, and concrete floors are popular with those wanting flooring that can handle significant wear and tear across the years and providing quality flooring for decades. Concrete is also less noisy to walk on compared with timber flooring, and boasts a modern, even futuristic aesthetic.

Concrete can be polished or unpolished, with different grinding and sealing finishes suiting varying budgets. Some people prefer concrete with a reflective gloss while others love matte. You can even stain or select colour treated concrete.

While concrete can feel hard, and be slippery if moist, it has come a long way in terms of sophistication. When deciding on a style, ask whether sealing or non-slip requires reapplication over time. Your flooring budget should take note of future costs.

If concrete is unpolished, a potential downside is moisture damage, risk of mould, and discolouration. Polished concrete is protected, and therefore popular in areas where water and food stuffs are more common, such as the kitchen, laundry, dining, and bathroom areas.

Another reason home builders opt for concrete flooring is the sustainability of concrete as a construction material. Sometimes preferred in bushfire regions for its fire resistant properties, concrete flooring comes in a wide array of textures, patterns and price points.

Some home builders love the coolness of concrete in Australian summers, but for others the surface is too chilly, although concrete flooring is in fact known for its thermal mass. Whatever you choose, investigate floor heating options if winter cold concerns you.

In summary

Choosing the flooring that’s right for your build is an important decision. Take the time to determine your vision, including what you need as well as what you want, so that you can build you dream home and have it become the place where you love to live.

Do you have questions?

Whether building or renovating, every project is about your vision meeting the needs of your lifestyle. A Smartbuild South Coast consult gives informed feedback, and can offer insight into how well certain flooring materials will suit your build.

Written by Jake Brady

How Does An Estimate Differ From A Quote?

Assuming an estimate and a quote are the same is a common mistake, and easy to make—however, the difference is significant to your project. Learning how these terms are used will help guide your approach to a new build or renovation.

We know that everyone prefers a builder that is upfront about cost. As the South Coast’s architectural custom home building specialist, Smartbuild always offer realistic and trustworthy estimates and quotes. As a transparent builder, we want to empower you to make the most out of your build by understanding the terms used – keep reading for our breakdown of the difference between an estimate and a quote.

What is an estimate?

An estimate can be viewed as a calculated guess. The figure is designed to give an initial idea of the total cost, but could differ from the final amount. While this may sound impractical, it does serve a purpose.

The estimate is a base to work from, and can be obtained while still deciding on final details. This allows you to consider the financial viability of possible fitting choices, or potential design changes for your new home.

When meeting with a client to discuss a project, we use decisions you’ve reached, in terms of size and design, as well as additional features, to create a detailed estimate for the project.

Perhaps your vision exceeds the budget. Or you may have underestimated, and an additional bathroom, bedroom or both is on the table. Providing an estimate will help with these decisions, allowing you to move forward with an understanding of where your budget can take you, and set the foundation for an informed quote in the future.

Sourcing a quote

While the only quote worth getting is one that you’ve paid for, don’t let this initial expense put you off – think of it as investing in peace of mind through financial clarity. Receiving a quote from a reliable builder will provide you with an outline of every cost, granting you a transparent insight into the expenses of your new build or renovation.

A free quote differs from a fixed price quote. A free quote may include low estimates that prove unattainable for your project, as the builder attempts to lure you in with deceivingly low prices. If given early on, a free quote likely won’t factor in detailed specifications or the entire scope of your build.

This approach leaves the budget open to unforeseen adjustments. With a free quote, you risk paying more as the project unfolds, leading to unexpected financial stress by the end of your build.

What does PC and PS mean?

Sometimes the cost of certain materials or trade services cannot be definitively predicted, especially if you haven’t yet decided on aspects of the build. These appear as Prime Cost Items and Provisional Sums.

Prime Cost Items and Provisional Sums can prove a hiccup to carefully maintained building budgets. And when a free quote is given, there is a possibility they could blow the budget out beyond your expectations.

A quality builder will focus on an informed price prediction, rather than presenting an unachievable budget designed to secure a sale. Be wary if the amount of PC and PS figures seem overly excessive or unrealistic.

Interested in a consultation?

With your questions answered clearly, the estimate and quote process should reassure you of your builder’s honesty and integrity. If you’re still struggling for clarity, it may be time to reconsider.

At Smartbuild South Coast, we’re upfront about the financial reality of your project, with transparent quotes and hands-on project management from the get-go. You deserve a stress-free building journey, and a premium quality custom home within your budget.

Ready to discuss your building vision? Reach out to our friendly and experienced team.

Written by Jake Brady

How To Create The Ultimate South Coast Outdoor Living Area

The South Coast is blessed with picturesque views and beautiful summer sunshine. To take full advantage of these qualities, it’s important to create an outdoor living area that is equal parts comfort, function and style.

This way, friends and family can enjoy your outdoor oasis year-round. More importantly, a perfectly-designed outdoor living area creates yet another space in the home to fill with love and of course, your personal style.

Keep reading to discover six ways that you can create the ultimate South Coast outdoor living area in your own backyard.

Summer shade is key

South Coast residents will tell you that during the summertime, the sun packs a punch. Instead of shutting the doors and remaining inside with the air conditioner on, create an outdoor living area that incorporates shade.

Shade can be achieved in a number of practical yet stylish ways. For example, you could utilise the limbs of a large backyard tree as shade for your decking area. Another option is to install outdoor blinds that can block out the harsh sun while still providing the distinct feeling of being outside.

Don’t forget winter warmers

While the South Coast plays host to idyllic weather, it doesn’t always escape the wrath of winter. Luckily, with a few key tips and tricks, you can ensure that your outdoor living area remains functional in both the summer heat and winter cool.

To provide warmth, consider installing an outdoor fireplace or fire pit in your outdoor living area. This way, guests and family members can keep warm and toast a few marshmallows on winter nights. Another option is installing a patio heater above or next to the sitting area.

Choose ambient lighting

After you’ve gone to the trouble of designing a home, you want to be able to enjoy all its features, day and night. That’s why it’s important to style an outdoor living area with ambient lighting.

Whether installing garden lights, placing lanterns by the pool, or stringing fairy lights through the pergola, think about practicalities. You want enough light to make your outdoor area comfortable, but you also don’t want lights shining too harshly. By incorporating different ambient lighting options, your outdoor area becomes a visual delight.

Consider cooking and dining facilities

The ultimate outdoor living area is, in essence, functional. To achieve functionality, design your alfresco space complete with cooking and dining facilities. This way, you can enjoy the very best of outdoor living throughout the year.

Installing cooking and dining facilities can be as simple or as complex as you like. For example, those looking for a simple yet effective solution could opt for a free-standing barbecue. For those after something a little extra, an outdoor kitchen complete with drinks fridge, functioning sink and pizza oven is a great option.

When incorporating outdoor cooking features into an outdoor living area, it’s always smart to provide adequate seating. For example, this could take the form of a large table complete with a bench on one side and dining chairs on the other.

Remember comfort meets style when it comes to furniture

When sitting outdoors and enjoying the environment you’ve cultivated out there, you want to be comfortable. Otherwise, your hours of hard work and styling will go to waste.

With this in mind, invest in durable and stylish outdoor furniture options. When shopping for products, think about variety. Some people like to sit in armchairs while others prefer couches. Provide a few options so that whether you’re enjoying the sun by yourself or having friends over, everyone is comfortable.

A touch of greenery goes a long way

Plants create a sense of tranquillity. They also provide you with a way to seamlessly carry your indoor style, outdoors. By choosing pots that match your interior colour scheme, the outdoor area becomes an extension of the inside.

Incorporating greenery into an outdoor living area can be accomplished in a variety of ways. One section of the garden can be filled with pots of varying sizes. The wall behind the outdoor sofa can play host to a vertical garden. Even sections of your pergola can be threaded with vines that will grow with time.

___

If you’re ready to start the process of designing and constructing your dream home, complete with a luxurious outdoor living area, get in touch with Jake and the team at Smartbuild South Coast today.

Written by Jake Brady

Everything You Need to Know About Timber Shingles

Shingles may not be the first thing you think of when building your new home, but they can play a crucial role in the function and exterior aesthetics of your home. Shingles have been used on homes for centuries from whatever materials were available, including clay, wood and copper. Now, however, there are boundless choices, so much so that it can be overwhelming and confusing if you’re not familiar with the cladding techniques and materials available. 

On the blog today, we’re giving you a crash course in everything we know about timber shingles – from their benefits all the way through to finish options. Our focus is on Raw Cedar shingles, which we’ve recently used at our Werri Beach project to stunning effect.

What are timber shingles? 

Timber shingles are a classic material that have been used to clad homes for decades. You’ll know a timber shingled home when you see one: they have a striking, rustic look and feel. We often see the style favoured by clients in country and coastal homes as they can give a home a distinguished, raw look that can be achieved with a number of different colours. 

To get a clearer visual picture, check out how we’re using raw cedar shingles at our current Hamptons-style home in Werri Beach.

What are the benefits?

There’s a reason timber shingles have been used for so long. For one, they have excellent thermal properties for both heating and cooling, which will keep your energy bills down. Timber shingles provide exceptional insulation, are incredibly durable and are largely low maintenance. For our Werri Beach project, the client was looking for an exterior cladding option that would last for many years to come, without needing regular maintenance and updates. The result is a look that ties in beautifully with the coastal setting and will be a long term solution.

Challenges

The application of timber shingles is entirely dependent on if you’re cladding a wall or roof, but always requires a solid nailing base. Cladding homes with timber shingles is a tricky and laborious process. For instance, all external corners need to be custom trimmed and fitted to obtain the correct angle of the shingles cladding. Recently at our Werri Beach project we had to scribe each corner shingle using an old-style hand planer. It was a time consuming process, but it’s certainly worth it for that gorgeous, custom-fitted and rustic finish! 

Finish options

There are a number of finish options to choose from when using timber shingles on your home. For example, they can be stained with a gloss or dark timber stain, painted in a colour of your choice, sealed with a clear sealer or simply left raw and allowed to silver.

The clients at our current Werri Beach project have decided to leave their raw cedar shingles to silver for a natural appearance. We love this look and are sure this home will continue to catch eyes on Werri Beach for many years to come.

____

Got a question about timber shingles? Get in touch with the team at Smartbuild South Coast.

Written by Jake Brady

Take A Closer Look…

This latest project built in Barrack Avenue has been an uplifting way to enter the new decade with such a smart design. The clients wanted to ensure there was ample living space and outdoor entertaining, and that’s what was executed using high-quality materials with a polished finish. The completed double storey townhouses reflect the Smartbuild South Coast team’s keen eye for detail and bespoke artisanship. 

The Exterior

The townhouses demand your attention with the James Hardi Linea weatherboard and Axon cladding that bring a clean and seamless detail to the charming abodes. Complimentary to the James Hardi cladding, the beautifully crafted and energy efficient Hanlon Windows are an exceptional feature that ensures the residents remain cool in Summer and warm in Winter, an effective way to reduce the cost-of-living. The bright, welcoming exteriors add an eye-catching contrast with the exposed aggregate concrete driveway that leads into the accompanying spacious double garages. 

The Interior

Our two freestanding townhouses boast inviting open-plan living, both with integrated indoor-outdoor entertaining areas, which optimise the flow of the house and allows plenty of natural light and fresh air indoors, gifting each residence with a warm and welcoming atmosphere. Drawing upon a multitude of high-quality materials for this project, we include engineered hardwood floating floorboards, which is a popular choice in Australian homes as it suits many interior styles and fulfils an airy and light ambience. The light colour decor and flooring leave you with a holiday feeling all year round. 

Kitchen

The kitchen is an exceptional asset to this home, the white marble island bench allows for spacious cooking space, enough to create a 3-course meal, while high-end appliances sit seamlessly between the white marble countertops. The bright kitchen cupboards and silver finishes illuminate the space as they sit adjacent to the outdoor area – delivering an open space for moments of commensality.

Bedrooms

In addition to the engineered hardwood floating floor, the semi-floating staircase adds a striking architectural focal point upon entering the homes, which leads upstairs to the glass balustrade and the three spacious bedrooms, the master suite boasting an ensuite with floating basin and a stunning polished accent wall of sleek white diagonal-crossed tiles. Each spacious room is fitted with Venetian style horizontal slats, a stylish addition throughout the house that ensures an adequate level of privacy.

Bathroom

The spacious bathrooms are equipped with an elegant freestanding double bath for those intimate moments, with a matching feature wall that complements the master ensuite and kitchen. These small touches ensure the fluidity of the home expands throughout.

Smartbuild is proud to have been apart of this project and to have delivered the exceptional craftsmanship that the team do on every project – no matter the job, Smartbuild South Coast always provide high-quality results.

To learn more about our projects or to find out how the team at Smartbuild South Coast can help create your very own architecturally-designed custom home, get in touch today.

Written by Jake Brady

Everything You Need To Know About Building A Pool

Take the Plunge into our Q&A with Cloud9 Pools

When it comes to building a luxury home on the South Coast, this often includes a pool. But where do you start when it comes to the design, fencing and colour palette of your pool? Not to mention the construction process… You turn to the experts, of course.

We recently sat down with specialists Rob Lewis and Glenn Heath from Cloud 9 Pools to discuss all things pool construction. Smartbuild South Coast has worked with the team at Cloud9 pools on many projects over the years, including a part inground, part above ground pool on a steep site in Figtree, an award-winning above ground pool in Kiama and a pool and spa combo at Smartbuild HQ in Shellharbour. We can testify to this – when it comes to creating an aqua oasis inside your home, the team at Cloud9 Pools certainly know what they’re doing.

Keep reading to find out everything you need to know about building a pool, according to Rob and Glenn.

Smartbuild South Coast (SBSC): What are some of the most important considerations when it comes to pool placement? 

Cloud9 Pools (C9P): How the pool will be used by the owner is our first priority. Most people want a pool to be an extension of their outdoor living space, located close to the alfresco area. This will result in a pool that is used more often, as homeowners will already be spending the summer months outside. It also will result in a pool that is visible from the kitchen and or living space meaning the pool also doubles as a kind of water feature from the house. 

SBSC: How do you determine if an inground or above-ground pool will work better for the space? 

C9P: All of the pools we build are made from reinforced concrete, so structurally there is little difference, except for a few details to the steel for above ground pools. When it comes to hydraulics, there is no difference between and above ground or inground pool. The real difference comes with the slope of the yard. 

A block that slopes away from the rear alfresco would be better suited to an above ground pool so that it creates a one single-level space extending from the house. An inground pool will work much better for a flat block. 

SBSC: What’s involved in the process of installing a pool? 

C9P: The first step is to meet the customer onsite to discuss the design requirements and send out a quote based on the design. Once the customer accepts the quote, we will sign a preliminary agreement. We will then get plans drawn up to be approved by the Principal Certifying Authority. Once plans are completed and approved, we sign a contract with the client and schedule into our construction timeline.

Then the digging starts! This will usually take 2-3 days depending on the site conditions. Immediately after the digging is completed, formwork and reinforcing steel goes in. Then the skimmer box and pipework are installed to the reinforcing steel. After that, the area is sprayed with concrete to complete the shell. The shell is then left for 28 days to cure.  

After curing, the waterline tiles and coping are added. Once that’s done, and any pool surrounds have been paved, the fence is erected. Then whatever interior finish the client has selected is applied. This takes a day and then the pool is filled the following day. After that, the pump and filter are installed, and chemicals are added. 

When that’s all done, our customers can enjoy their new pool! The final step is for us to sign up your pool with the NSW swimming pool register and have a private certifier inspect your pool to be signed off.

SBSC: How do you determine the best type of pool for a block? For example, what kind of pool would best suit a narrow block?

C9P: Generally speaking, a narrow block will better facilitate a narrow pool. However, there are other factors to consider like sewer easements, access to BBQ areas or garages, prevailing winds, as well as the shade and slope of the block. These are all factors that will impact the size, position and shape of the pool. When the block is narrow it can limit options but often result in a unique design. 

SBSC: What types of pool fencing would you recommend? 

C9P: Frameless glass is by far the most popular fencing, as it doesn’t obscure the view of the pool. But if privacy is needed, people often opt for hardiplank or blue board screening. There are also plenty of new products for every fencing need and taste, including aluminium louvres, rusted steel screens and timber palisades. The sky really is the limit! 

SBSC: Are there any unexpected considerations when it comes to pool design and installation? 

C9P: Excavation will always produce variations that cannot be predicted. Sewer lines can often run through backyards and sometimes not appear on the plans. Rocks are another aspect that we don’t know about until we start digging.

Something that we find on blocks in older suburbs is buried waste. These are all things that cannot be predicted until excavation has commenced. However, we always ensure that we let our customers know of the potential for this to occur, so they aren’t hit with an unexpected bill. Whenever we deal with something like this, we charge a “do and charge” rate to keep the costs as low as possible for the customer. 

SBSC: Can a pool be designed and installed to suit any budget? 

C9P: We try to keep our costs down wherever possible without compromising on quality or the features that we include. This ensures that our pools will work with minimum maintenance and ultimate efficiency. But we also get charged minimum rates from our subcontractors so there is a certain level of costs that can’t be avoided. As such, our pools start at $45,000 and move upwards from there depending on size. The beauty of a concrete pool is that the pool walls can be used as retaining walls, creating level spaces on sloping blocks much cheaper than fibreglass pools can. 

____

If you want to learn more about adding a stunning pool to your South Coast home, get in touch with Rob Lewis and Glenn Heath from Cloud9 Pools. If you’re keen to build a brand new luxury home, give Jake from Smartbuild South Coast a call on 0431 388 059. 

1 2